Monday, February 27, 2012

Liebster Blog Award

I was completely surprised and humbled to have been awarded the Liebster Blog Award by my fellow stamper, Audrey!


Liebster' is German for 'dearest'. The award is a 'share-the-love' arrangement, given to inspirational bloggers with less than 200 followers.

Here's the to-do list of any Liebster award recipient:

1. Thank the giver and link back to the blogger who gave it to you.
2. Reveal your five blogger picks and let them know by leaving a comment on their blog
3. Copy and paste the award on your blog (see above)
4. Hope that those you award forward it to their favorite bloggers.

Now, I have to confess that I don't get nearly as much time to browse and comment on my favorite blogs as I would like to! But there are several that check out regularly, have items from on my Pinterest boards, and get lots of awesome inspiration from. :) So I'm happy to pass the award on to:

Becky - The Lakeshore Stamper
Keva - How Now Brown Cow
Taheerah - Fill Your Paper with the Breathings of Your {Heart}
Nadine - Wahine Inks
Deanna - Kloset Kreations

Thank you again, Audrey! You are a huge inspiration to me, so being on your list really brings a smile to my face! :)

Saturday, February 25, 2012

PTI February Blog Hop: Interactive Cards

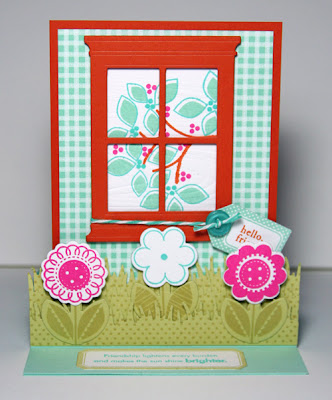
Over at Papertrey Ink, it's all about interactive cards this month - including the Blog Hop Theme! I decided to create an "easel card", because I've seen a few of them around (most recently, this cute card on Ted's blog), and I had a vision that involved using the Poppystamps Window die that I recently purchased. :) My new PTI order arrived while I already had this card in progress (can't wait to play with my new zippers and sliders dies and Movers & Shakers set!), so I used my brand new Lovely Leaves stamps to make the pretty little tree branch behind the window. :) The window is popped up on the base (which is layered with a piece of the new Aqua Mist patterned paper), with the tree image on white cut to fit just behind the window.

My color scheme is Aqua Mist and Canyon Clay, with a little bit of Hawaiian Shores, Spring Moss and a touch of Raspberry Fizz thrown in. Here is the front of the card: The Canyon Clay rectangle mat is only attached to the lower 1" of the card front, below a score line in the front panel.

When you open the card up, this is what the inside looks like.


The inside of the card is created on a 4.25"x2" strip of Aqua Mist, which I scored and folded 1" up from the bottom. This piece is attached to the inside of the card, with the lower 1" adhered and the upper 1" able to fold up. I stamped Spring Moss with Polka Dot Basics 2, and then used a border punch to punch 3 layers of grass, which are layered together and adhered to the "flap", and then I used various flower die-cuts from the Flower Fusion series and adhered them, tucked down into the grass. The sentiment is stamped on the label die-cut and adhered to the lower part of the inside flap.

Now, when you fold up the front panel and the inside flap, and tuck the lower part of the front panel down behind the inside flap, this is what the card looks like:


How cute is THAT? :) Here are some more angles to get a view of how the whole mechanism "works".


And here is how I stamped the front of the card, with Background Basics: Sheet Music in Aqua Mist, layered with Turning a New Leaf in Hawaiian Shores. Most of this isn't really seen of course, unless you peek behind the front layer. :)


Well, this was a fun challenge - thanks PTI! I can't wait to make some more fun, interactive cards with my new PTI goodies!

Saturday, February 18, 2012

Make it Monday: Creative Coasters

In the latest Make it Monday challenge, Jenn Ellefson shows some cool techniques involving the PTI coasters, a brayer, and ink refills. I used Turning a New Leaf (inked with Spring Moss), several Flower Fusion dies (inked with Summer Sunrise and Jenni Bowlin Chewing Gum), and the picket fence die (inked with Kraft). I stamped the flowers with Orange Zest and Rasperry Fizz.


The Tiny Tag is stamped with Spring Moss and tied onto the fence with twine. For flower centers, I pulled out my massive collection of brads, lol. The fence and flowers are popped up on dimensional adhesive.


I impressed the leaves and flowers with the Canvas Impression plate, and the fence with the Woodgrain impression plate. I also ran my Lemon Tart background panel through with the Sunshine Impression Plate (after stamping it with Polka Dot Basics). Here's a close-up to better see the textures:


Thanks Jenn & PTI for the fun technique and tutorial! And as always, thanks for looking!

Tuesday, February 14, 2012

PTI Anniversary Challenge: Interactive Cards

Well, it's the final day of the PTI February Countdown, and in today's post Nichole's challenge is to create an interactive card, to tie in to the introduction of the new PTI Movers and Shakers line of dies and stamps!  I haven't done too many interactive cards before, but I was eager to try out some ideas, and I managed to get two cards done today (and some laundry, lol!).

The first thing I thought of was to use the sweet airplane in Fly Away. I cut it from Stampers Select White and also from a coaster, and after coloring with Copics, adhered it to the coaster for more sturdiness.


I attached it through the slit in the background panel, which I created by sponging Summer Sunrise, Aqua Mist and Hawaiian Shores inks on white cardstock, after applying masks cut with the cloud dies. The panel is attached to the Kraft base with foam adhesive. The plane is attached with a brad, to the sentiment strip cut from Aqua Mist, and stamped with a sentiment from Up, Up and Away. I added the word "pull" on the punched circle using Simple Alphabet, and the "congratulations" sentiment on the front panel is from Tag-Its #4.


It doesn't slide quite as smoothly as I was hoping, but the general idea worked out well. :) As the sentiment strip is fully extended, the plane "flies" across the card front.


My second card was inspired by the new Movers & Shakers: Sliders dies that Nichole introduced today. I can't wait to get these dies, but I wanted to try to mimic the same effect. Although it worked, it was difficult to "engineer", so I know the dies would make it much more effortless and slick!

Anyway, I tried to create the front "window" panel by cutting with my craft knife. It was doable, but it looked very sloppy and not "polished" enough, so I wasn't happy with it. Then I had a lightbulb moment! I used my Tag Sale #1 Die to cut the window panel. I just positioned it on my cardstock, face-down on my Big Kick platform. Then I put the other plate on top of the sandwich, but positioned it so that the edge of it was partway down the die, where I wanted it to STOP cutting. Cranked it through, and voila - a 3-sided window cut! I then trimmed down the panel (I did that AFTER cutting, so that I didn't have to have the die perfectly aligned), and scored at the top and middle. Then I cut the "slider" panel to go underneath. The rest of it is constructed pretty much like Nichole shows in her tutorial video.


I used Celebrations for the front sentiment panel. The color combo is Canyon Clay, Hawaiian Shores and Harvest Gold. After I was finished, I wished I had something more with the HS panel.... so I added the twine and button, which helped a bit, but I still think it's a little bit plain. I was trying to keep it masculine-appropriate, though, just because it seems that I have fewer male-appropriate cards in my stash (even thought that's what I usually need - husband, father, brother, sons, lol).

I added the button on the tab at the top because I thought it would make it easier to grab and pull, and also more obvious that that is what is expected. Here it is starting to slide open:


And completely extended! I stamped the slider with Polka Dot Basics 2, just for a little added interest.


The inside sentiment is a combination of Daydreamer, Birthday Basics, and a decorative element from Celebrations.


Well, it was fun to try a couple of interactive cards, and it definitely got my creative juices flowing for all the fun that can be had with these new dies! I just know they will make these cards a real breeze to make (and did you SEE the Zippers?? Oh my gosh, how FUN!!)

Thanks for stopping by!

Saturday, February 11, 2012

PTI Anniversary Hearts Challenge #2: Love You Forever

The snow continues, and so does the stamping! :) This is my second post today for the latest PTI Anniversary Challenge: use hearts on a project (see my first post here). I still had Love and Marriage out on my table, and I really like that heart with the script words. I had been floating an idea around in my head to do a "cut out panel" with the heart, so here is what evolved:


Lots of sets used here: Background Basics: Circles for the rows on the upper part of the card base; Love Lives Here for the little heart that I "randomly" stamped in some of the circles (trying to deliberately make something look random can be harder than it sounds, lol!); Turning a New Leaf for the tone-on-tone pattern on the Pure Poppy and Hawaiian Shores panels; and Little Labels for the sentiment.


Originally, I was going to stamp the heart directly on the blue panel. But I wanted more contrast and I wanted to bring in the Summer Sunrise to tie into the mat behind the red/blue elements, so I stamped it onto the die-cut heart instead. I also impressed the red with the Picnic Plaid impression plate, and the blue with the Canvas IP. The red is popped up on foam adhesive, and the "love you" label is also popped up. The twine and button finish it off!


It's still snowing here... who knows, maybe I'll get back to the stamp table this evening. :) Thanks for looking!

PTI Anniversary Continues: Hearts-A-Plenty!

It's a cold, blustery, snowy day here in the Pittsburgh area, but that's ok! I don't have to go anywhere, and it's just a perfect day for hanging out at my craft table! :) As the Anniversary month countdown continues at PTI today, Nichole issued a fun and timely challenge for today: create a project that incorporates hearts! I couldn't wait to get to it, since I had an idea for hubby's Valentine's Day card and hadn't actually sat down to work on it yet! :)


My color palette is Vintage Cream, Pure Poppy and Hawaiian Shores. I just knew I wanted to use that gorgeous tree from Love and Marriage, and I remembered how Betsy Veldman added the fun little heart to the tree trunk during the countdown. The sentiment is from the same set, and the little row of teeny hearts is from Tag-Its #11. I used the heart border die (fast becoming a favorite for me!) two ways: as the heart border between the image and sentiment portions of the card, and as the teeny little scallops peeking out from the edges. I layered the Mat Stack 5 and Layerz dies and then trimmed the top off, for the sentiment panel.

The whole image/heart border/sentiment panel is popped up on dimensional adhesive. Here's a close-up of the fun heart at the bottom (which is also popped up). I cut it with the medium die in the Heart Prints die collection, and then stamped it with the tree image so that it would coordinate with the tree on the card. I really love how it turned out - it's fun to find images that work in ways that you might not have originally thought of!


Thanks for looking!

Thursday, February 9, 2012

PTI Anniversary: Pinterest Inspiration!

WOW, I managed to crank out some craftiness today! I completed THREE cards for the latest PTI Anniversary Challenge. After introducing PTI's Pinterest Boards, Nichole issued the challenge to created a project based on a Pinterest image. HOWEVER, I only realized just now as I am writing this blog post that I slightly misunderstood the challenge: I thought the inspriation was supposed to come from a pin on the PTI Pinterest boards, so that's what I used - but hey, that means I used an image on Pinterest, so I think that counts! ;) I have to post these quickly as we are off to a Cub Scout meeting tonight, so no frills, no fuss, just my projects and links to my inspirations! It was soooo easy to be inspired by the PTI boards! So here are my cards: 


Yikes, look at the time - gotta run! Thanks for looking! :)

Wednesday, February 8, 2012

PTI Anniversary Color Challenge!

Well the PTI Anniversary festivities continue, and today's challenge is all about color. Each of the designers shared a favorite color combo and then we pick one and use it for a project. Now, I was thrilled to have a color challenge and so many options to pick from, as I do tend to find myself reaching for the same colors time and time again - usually a combo of an orange (Orange Zest or Canyon Clay) and a blue or aqua (Hawaiian Shores, Aqua Mist or Spring Rain). So I promised myself that I would not pick a combo that had more than one of my most-used colors! I ending up choosing Lisa Johnson's combo: Kraft, Pure Poppy, Spring Moss and Aqua Mist.

I made a larger, 5x7 card, using Turning a New Leaf, Celebrations, and the sentiment from YOF: Lily of the Valley (which fit so nicely in the Celebrations frame!).


The panel and the frame are both popped up on dimensional adhesive.


Twine and a button always makes for a simple finishing touch!


Thanks for looking!

Sunday, February 5, 2012

Another PTI Anniversary "Favorite Things" Card

No way... two posts in a few hours? ME?? How highly uncharacteristic, lol! But it's going to be a busy week ahead, and I'm not sure how much I'll be able to play along with the PTI anniversary festivities, so I'm glad that I got in some extra crafty time today. This is my second card for the "Favorite Things" challenge. This time I took my inspiration from Dawn McVey's favorite project (which you can see at the bottom of this post).

I followed her layout and stuck with the blue and pink color scheme, with the addition of the green leaves. I mimicked her stamped background but used an image from Harvest Berries. I switched out her tag for Mat Stack 5, which I turned into a "tag" by punching a hole with my Crop A Dile. I switched out the flowers for Rosy Posie.
My tag and the flowers are both on dimensional adhesive.

Here is Dawn's original card:


Well, I think that's it for me for today.... thanks Dawn and PTI for the inspiration, as always! And thanks for stopping by! :)

and the PTI Anniversary Festivities BEGIN!

As any die-hard Papertrey Ink fan knows :) February is PTI's "anniversary month" and there are always lots of fun things going on to commemorate the occasion! This year will mark PTI's 5th year, and Nichole has rolled out the first of the sneak peeks, along with an awesome challenge on her blog today! Each design team member shared a favorite PTI project and a list of their favorite PTI products. For the challenge, Nichole invited us to choose one of the DT favorite projects and use it as inspiration for our own project! Oh my, what a tough choice to pick one, because the PTI design team is such an amazingly talented group and all of their shared projects were inspiring! But I had to go with Lisa Johnson, since her card really jumped out at me!  (See her card at the bottom of this post.)

I wanted to use Lisa's basic layout as my starting point, but change up the colors and certain elements and change it to a birthday card. I liked her use of Kraft and Vintage Cream as neutrals, but I added Hawaiian Shores and Canyon Clay in my color palette. (My photos came out awfully bright, but that IS vintage cream, lol.) I used Celebrations, and grabbed the word "birthday" from Birthday Basics. Background Basics: Tin Types and Circles, and Mat Stack 5 Collection also got to come out to play. I changed the dies I used for the focal point (Mat Stack 5 and the Happy Day die, which coordinates with it so nicely!). 

I popped up the "Celebrate" strip and also the Mat Stack 5 and the sentiment layer on foam adhesive.


Here is Lisa's card, which I used as my inspiration:


What a fun challenge this was! The PTI design team is always so full of inspiration, tips and ideas, month after month. Thanks for all that you do!

And thank you for stopping by!

Friday, February 3, 2012

a Rosie Posie birthday!

I have a Rosie Posie birthday card that I recently made for a good friend to share today! The color palette is PTI Simply Chartreuse, Summer Sunrise, Canyon Clay and Vintage Cream. I embossed the cardbase with the Woodgrain Impression Plate, but first I applied Versamark ink to the plate. I love how it gives the embossing just that extra little added "umph".


I love that teeny tiny little scalloped border that peeks out from behind the panel. That's the new Heart Border Die! I was on the fence about getting this die (cute, but how often would I use it??) until I saw someone use it as a mini-scallop like this.... then it had to come live with me!


The sentiment is from Big Birthday Wishes, and the background of the panel is Polka Dot Basics 2, stamped in Canyon Clay on Summer Sunrise.

Thanks for stopping by!

Wednesday, February 1, 2012

Waltzingmouse Stamps Sketch Challenge #82

I'm so excited to be playing along for the first time on a Waltzingmouse Stamps sketch challenge! I have oogled and admired the stamps for a while, and just finally ordered some in December. I can't wait to add more to my collection! You can see the WMSC82 Sketch at the bottom of this post.

One of the sets I got and couldn't wait to ink up was A Cottage Home. I couldn't resist that little house, all fairy-tale-ish and begging to be colored! :) My color scheme is PTI Hawaiian Shores, Orange Zest, and Lemon Tart. 


I used Copics to color the large house and also the smaller "inset" image, which I hand-cut and then popped up on dimensional adhesive. I also used the decorative scrolly "hinge" image from the set to embellish my scalloped border. I also used Very Vintage Labels No. 4. for the frame on the sentiment die-cut, and popped it up as well.


And here is the sketch, which I turned on it's side:

I still haven't inked up all of my new WMS goodies, so I'm looking forward to playing along again soon! Thanks for looking!