Sunday, September 18, 2011

Happy FIRST birthday to my sweet and beautiful niece!

My adorable little niece turns ONE today! Happy Birthday Jessica! I used Big Birthday Wishes for this card, along with the By the Number dies and some fun Echo Park patterned paper. My favorite Doily Details die created a pretty layer for the focal point.


I finished the inside too and added that cute little cupcake from Tiny Treats: Birthday. I have to confess, though, that the addition of the cupcake all stemmed from stamper error. I originally stamped the "happy birthday" directly on the inside of the card, but a big blob of ink smudged from the corner of my acrylic block. I HATE THAT! I had to fix it (the front of the card was already completed) so I cut the little white rectangle to stamp the sentiment on, but then felt like it needed something else - voila, cupcake + Copics and problem is solved! :)


Thanks for looking!

Monday, September 5, 2011

Make It Monday: Background from non-Background Stamps

The newest Make It Monday challenge is to create a custom background by repeated stamping of images that are not intended as backgrounds. I noticed recently that I need to beef up the supply of birthday cards in my stash, so I used the cute little cake image from Tag-Its #1, which I stamped in alternating staggered rows of Orange Zest and Hawaiian Shores. Then I added the repeated "happy birthday" sentiment, also from Tag-Its #1, in green. The "eat cake" sentiment (it seemed the obvious choice, lol) is from 2011 Birthday Tags, and is stamped on a Label Basics circle, along with the coordinating little curly strip from Tiny Treats: Birthday


I attached the circle to a Doily Details doily, tied on a Tiny Tag, and added a Hawaiian Shores button and twine. The tag is popped up on dimensional adhesive.


Thanks for looking!

Saturday, September 3, 2011

Happy Birthday to my OLDER brother! :)

Just a quick post to share the birthday card that I recently sent to my brother. I just got PTI's Enjoy the Ride - one of those sets that I have seen around for a while but it just finally "caught my eye" and I suddenly had to have it! LOL! This is the first card I made with it. I think it's going to be a very versatile set! Rather than use one of the fun license plate phrases that came in the set, I used Simple Alphabet to put together my own license plate message. ;)


I also just Polka Dot Basics 2 on the background, and the Cane Print impression plate.


Thanks for looking!

Tuesday, August 30, 2011

Make it Monday: Colored Pencils

I got a little bit of time today, so figured I would tackle the newest Make it Monday Challenge on Nichole Heady's blog! Jenn Ellefson did a great tutorial on using colored pencils, something I've never really experimented with. I thought that the boys had some cheapo colored pencils in a big art set that they have had for years, so I went to find them, and lo and behold - found a 24 box of Prismacolor pencils instead! WOOHOO! I don't have any of the little blending tools that Jennifer used, so I improvised: I cut a Q-tip's cotton tip off and trimmed the stick a bit so that it came to sort of a dull point, and dipped that in Baby Oil to blend the pencils. It wasn't perfect (I'm sure the proper tool would work better), but it definitely did the job!

I used the flowers from Summer Jar Fillers in shades of pinks and purples with the stems from Daydreamer and a Little Label for the sentiment. I added a teeny little dot of Liquid Pearls to the center of each flower.


Thanks for the great video, Jenn and PTI! I still love my Copics, but I think I will be reaching for colored pencils again from time to time! :)

Thursday, August 25, 2011

Papertrey Ink August 2011 Blog Hop!

GO, ME! I didn't think I was going to get to participate in this month's blog hop, because I had not had a chance to do a project for it yet. But, I managed to squeeze in some stamping time today and made a card! Yay! The challenge this month was to use the inspiration photo that Nichole provided. (See the bottom of this post for the photo.) The things that jumped out at me from the photo were:
1. The colors pink and green
2. The pretty flowers
3. The jar - maybe since I just recently started to aquire the Friendship Jar and Fillers series! :)
4. The pattern on the inside of the case - which I don't think is exactly damask, but it reminded me of damask, and screamed out for me to use Damask Designs! :)

I was also eager to use the new Bloom Builders #3 die, so I made my flowers out of that, using Daydreamer for the stems.


The flowers are Raspberry Fizz and Hibiscus Burst. I used Tiny Tags for the sentiment, and added another small single image from Damask Design to tie it into the background.


The original inspiration photo is below.  Thanks for looking!


Thursday, August 18, 2011

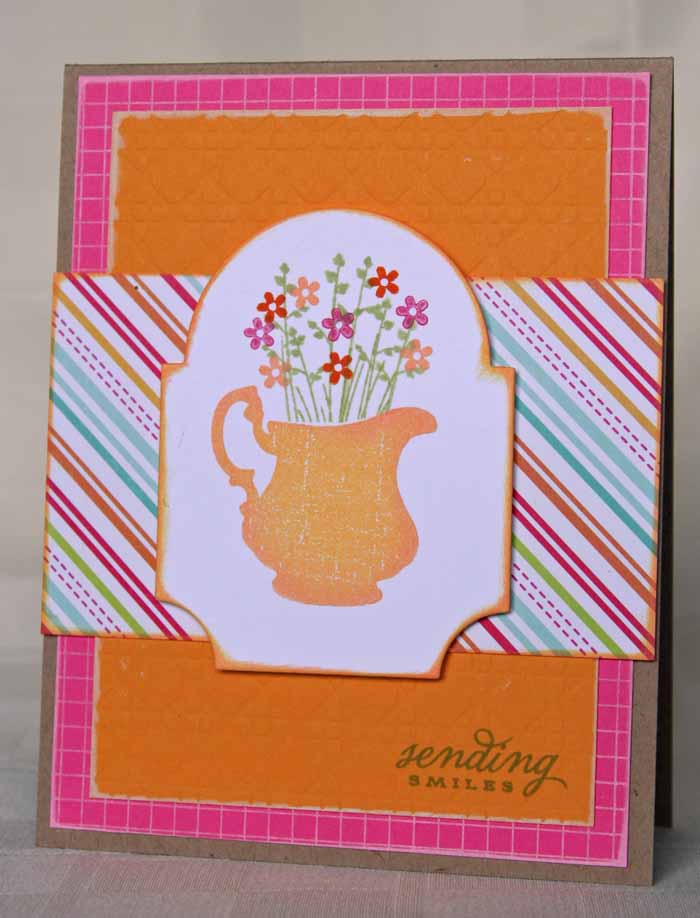
sending smiles

Just a quick post today, to share this card that I made a while back when I wanted to play with my Iconic Images set. I added flowers to the pitcher using Peaceful Garden greenery, and the little flower from Tag Its 3. The sentiment is from Little Labels.


Thanks for looking!

Monday, August 15, 2011

Make it Monday: Glitter Die Borders

OK, I'm not gonna lie. When I saw the topic that Erin Lincoln came up with for this week's Make It Monday technique on Nichole Heady's blog, I was not sure whether I wanted to try it. Glitter and I typically do not get along very well! But, I had an idea of where to go with it, and after all, the whole point of the MIM challenges is to try new things, right? :) So off I went!

Just today, I got Damask Designs in the mail, as part of a lovely prize package from a blog giveaway I won at Are You On the Fence, so I was eager to put it to use! So I used the Mat Stack 5 die, splitting it in half to use on either side of the card front. I liked the Hawaiian Shores and Smokey Shadow color combo, but I wanted another pop of color so added the Eyelet Lace border to each edge in Raspberry Fizz.

Here is a close-up look at the glitter border, and the bit of bling I added to the sentiment (Creative Charms clear gems colored with a Copic to match). The sentiment is from the Round and Round anniversary set, and is on a banner from Banner Builder.


Well, thanks for the challenge Erin, and for pushing me outside of my comfortable little box! :) I'm not sure that I'm converted to a glitter fan, but it was fun to pull it out for this project, and I'm very happy with the result.

Thanks for looking!

Sunday, August 14, 2011

Make it Monday: Custom Copic Striped Ribbon

The most recent Make It Monday video from Nichole Heady is all about making your own custom-striped ribbon using Copic markers. I have to say, Nichole makes this look so easy in her video! And although I've done it once or twice before where I completely colored the ribbon, I found it really difficult to get a crisp, clean stripe when I tried it here. She suggests using grosgrain or satin ribbon, and I was using PTI's satin, so maybe grosgrain would be the best choice. But anyway, after a few tries, I was reasonably happy with the result!


As I mentioned in my last post, I just recently started to acquire some of the Friendship Jar series, so I was eager to use the Hydrangea bouquet from the Summer Fillers. I used Mat Stack 4 for the focal point, with the sentiment coming from Little Labels, the bee from Tag-Its 3, and the flight trail from the Summer Fillers set. I used a strip from Half and Half in versamark on Summer Sunrise cardstock for the striped accent strip under the focal point. The hydrangeas are colored with Copics (mostly from the Raspberry Fizz and Hibiscus Burst collections).


I also added a little dot of Liquid Pearls to the center of each of the flowers.


Thanks for looking, and as always, thanks Nichole for another great MIM challenge!

Friday, August 12, 2011

sending smiles in a friendship jar

I finally caved and started buying the Friendship Jar series, LOL! I've always thought they were fun, but resisted "going down that road"... until now. I started with the original set and the Spring Fillers. Ohhhh, how I have coveted that beautiful tulip bouquet! So of course, that was the first thing I did. I also used the new Little Labels set and die. I wanted to keep the sentiment small and not cover up the flowers that I worked so hard to color!


Check out the striped lower half of the card base... look familiar? I used an image from Half and Half, stamped across the bottom, to add that pattern.


Here is a close-up of the flowers, which I colored with Orange Zest and Summer Sunrise copics (for the most part).


Thanks for looking!

Sunday, August 7, 2011

a difficult sympathy card

Many of you who are regular readers of my blog saw this post last month, about the tragic loss of my friend Chris Hertel. The card I'm sharing today is the sympathy card that I sent to Chris' family. It was probably the most difficult card I've ever had to make, both because I was unspeakably sad at the need for it, and also because I so wanted it to be absolutely perfect.


I cut the strip from Vintage Cream with a Half and Half die, and then used PTI's Peaceful Garden on the focal point. I love the effect of layering the different images in a very light brown, and then adding the single foliage image in Terracotta Tile, as well as the little butterfly from Postmarks. The sentiment is a combination of Verve's Kind Words and PTI's Round and Round (3rd anniversary set).


I added a strip of Damask Designs paper and a Leafy Vine die-cut border, after using the Woodgrain Impression Plate on the Kraft panel. The three gems are colored with a Copic to match the Spring Rain card base.


I also finished the inside, to echo the front design:


Although this was a heartbreaking card to make, I found solace in thinking, "I think Chris would like this". I hope so. I miss her, and to her family - you continue to be in my thoughts and prayers each day.

Thursday, August 4, 2011

A Modern Basics Happy Birthday

A quickie post tonight! I've had this card loaded for a while, but just haven't gotten around to posting it. I made this shortly after I got Modern Basics. I was playing around, "getting to know" it, and trying to do a fairly clean and simple card. It still ended up with layers, but what can I say... I gotta be me! LOL! I just find it very hard to do a one layer card, so maybe I should just quit trying! :)


I stamped the pattern and colored in the solid blocks with Copics. I cut out the strip, and the sentiment, which is popped up on the card base. I added some Fancy Flourishes in Fresh Snow and a bit of bling to finish it off. 


By the way, while you're here, you might notice that I recently added the Networked Blogs widgit over there in the right sidebar! I'm still figuring out how Networked Blogs works, but I know I LOVE it for the blogs that I follow! I would love it if you would sign up follow me. :)

And as always, thanks for looking!

Tuesday, August 2, 2011

Make it Monday: Decreasing Aperatures

I really liked Jenn Ellefson's technique in this week's Make It Monday challenge - Decreasing Aperatures, which is basically a fancy way to say "cut windows from bigger to smaller"! :) I got a chance to play around today and I really love the result. Here is my card:


OK, here are the layers. In the orange patterned paper (from Echo Park) I cut the Mat Stack 4 shape. I cut the pinked-edge Limitless Layers die from Orange Zest and adhered that to Hawaiian Shores cardstock, on which I had stamped the Mat Stack 4 striped image in Versamark. Then I cut the 1.75" circle through both layers. That whole panel is then popped up on the card base. Now, on the base, I adhered an orange zest "frame" (I cut the inside with a square nestie so just the border would show), and I also adhered a small square of the polka-dot Echo Park paper. Then I carefully cut the Love Lives Here house shape from the card base.

Take a look at the inside of the card - I die cut the house again on white and stamped the images on it. Then I adhered it through the card front to be perfectly aligned, and stamped the little heart in the opening - one last aperature! Added the grass and the inside sentiment for a nice little greeting.


Now, if I may, I want to take a minute to mention the front sentiment, because I'm so darn proud of it! LOL!


I knew I wanted something along the lines of "congratulations on your new home" but I don't have that in any of my sentiments. However, one of my favorite sets - Signature Greetings - has a "Congrats on your new little bundle". I stared at it for a second and realized that it wouldn't be hard to selectively ink , which I did by putting scotch tape over the "little bundle" part of the stamp to ink it, then pulling it off before I stamped. For the word "home", I liked the font in Love Lives Here's "my home is wherever you are", and it had the cute little coordinating heart, but it also had that dashed line very close to the text. I decided that rather than trying to mask off the line, I would just incorporate it into the sentiment. I think it grounds the other text nicely!


The three gems at the bottom are from Creative Charms, and I colored them with a Copic marker to match the Hawaiian Shores cardstock.

I'm not sure where this one is going, but I really like how it turned out! thanks for a fun technique, Jenn! I already have another couple of ideas brewing for later this week! :)

And as always, thanks for looking!


Monday, August 1, 2011

happy birthday to you

Just a quick post to share another birthday card, continuing the theme from yesterday's post (featuring my hubby's card). Today I have another masculine card - this is the one I made for my Dad's birthday earlier this summer. I used Alpha Blocks and dies, and Grunge Me on the patterned paper background. For the letters "you", I used the "kissing" technique to grunge up the solid-fill of the alpha block letters a bit.


Thanks for looking!

Sunday, July 31, 2011

Happy Birthday to my hubby!

Today is Mark's birthday, so once again, he's "2 years older" than me! HAH! I really struggled a bit over this card, and it ended up different from what I had originally pictured, but I'm happy with the result so I guess all is well. :)

I really wanted to use Big Birthday Wishes, which I only recently added to my stash. I have had that fun Tag Sale #4 die for a while, but it has been woefully neglected. It was the perfect size for this sentiment, and I dressed it up by adding the cake image from Tiny Treats: Birthday. I felt like the bottom of the tag needed something... a scroll or medallion or some decorative element, but as I scanned my sets I decided to pull out Modern Basics, which I think worked perfectly.


The little present is from Make A Wish Additions and uses the dies also. Do you notice that subtle striped pattern? That's one of the background strip stamps from Half and Half, done in Versamark! I really like the effect, will definitely need to remember that! Other items used: Spellbinders Lacey Circle die, Stampin Up notebook edge border punch, PTI Argyle Socks patterned paper, cardstock colors Terracotta Tile and Dark Chocolate, Blueberry Sky button.
I finished the inside also, with a sentiment from Big Birthday Wishes, coordinating patterned paper, and the Modern Basics stamps again.


Thanks for looking!


Tuesday, July 26, 2011

Stamp-a-faire Challenge #10

Nichole has offered up one last Stamp-A-Faire challenge, and kindly given extra time to get it posted! This last chaellenge is to "add a stamped focal point over a stamped background, all in the same layer!" I just love this challenge, as I've been trying to do more layered stamping.... I love the look!

So I decided to start my layering with BB: Sheet Music, one of my favorite sets, and it hasn't seen the love that it deserves lately. I layered a branch from Little Bitty Bird, and the sweet little birdie, who is popped up on foam adhesive and shaded in just a bit with Copics. I added the sentiment from Make A Wish, again layering it right on top of the focal point.  


All of this was stitched onto a kraft panel that I impressed with the woodgrain Impression Plate, then added a strip of Pink Paislee patterned paper, before adhering it to my spring rain card base. I sort of imagine that the music is giving the impression of that sweet Little Bitty Bird singing the "happy birthday to you" to the recipient! :)


Thanks for looking!