I finally finished a pair of cards for this week's Make It Monday, and I also have a tip to share! Lots of photos in this post! :) See the bottom of the post for my tip on "expanding" the sun rays in the Hello Sunshine stamp set.
The challenge for Dawn's MIM tutorial is to make similar cards with varying amounts of layers and embellishments. I didn't make my cards as similar as Dawn's, but they do have similar design elements. I used the new Hello Sunshine set for both. The first is the "stepped down" version. I created the sunburst background using Summer Sunrise and Hawaiian Shores ink, and used the Happy Day label die-cut for my sentiment focal point. I stamped the medallion from Lovely Layers (a perfect fit!) in Harvest Gold, and then stamped the sentiment from Beautiful Butterflies on top.
I finished off the focal point with a few clear gems and popped it up on the sunburst panel, which is then adhered to a Harvest Gold card base.
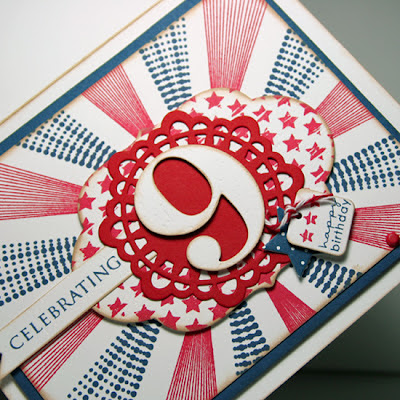
My second card, the "stepped up" version, is for my son's upcoming 9th birthday! Since his birthday is July 3, it's always easy to work with a red/white/blue theme. This card is larger than the one above - the sunburst panel (in Enchanted Evening and Pure Poppy) is 5.5x4.25, and the card base is 6.25x5.
For the focal point, I have a Mat Stack 5 stamped in Pure Poppy with the stars background from Est. 1776. I then layered a Pure Poppy Doily Details die-cut, and a By the Numbers number "9" die-cut. I used two Tiny Tags, stamping the square one with the "happy birthday" from Tag-Its 1, and the little stars from Est. 1776. The "celebrating from Big Birthday Wishes is stamped on a double-ended banner die-cut.
The Enchanted Evening mat, the Mat Stack 5, and the number 9 are each popped up on foam adhesive for more dimension and visual impact of the layering. I finished the panel off with 3 little brads in the bottom corner, and by inking the edges of all the layers with light brown chalk ink.
Now, here is my tip, which might be obvious but I'm not sure I've seen it mentioned before. Because I wanted to layer the sunshine "bursts" behind a larger focal point, I wanted to "expand" the sunburst. But I still use the ingenious starburst circle positioner in the set, to get a perfectly spaced, "even" sunburst. So here is what I did.
First, I used a gridline stamping block and very carefully and deliberately lined up the sunburst so that the center line of the block goes right down the center of the sunburst, and so that the tip of the sunburst is right at a "crossroads" of the gridlines. Here I inked it up with black ink to make sure you can see what I mean:
Now, stamp the positioner sunburst circle in whatever color you want - I used black since it will be covered up when the card is complete. Then ink up the sunburst, but instead of positioning it BETWEEN the lines of the circle with the point in the center, you will position is at the END of the line, with the "crossroads" at the tip right at the end of the line, and the center line of the block directly OVER the LINE of the positioner circle, like so:
I worked my way around the circle like this, stamping in Hawaiian Shores at every other line. Then I went back in with the solid sunburst and stamped the same way, and the alternate lines. This is what I ended up with:
Using this method, you can "expand" the overall size of the sunburst as much as you want, whereas if it was stamped in the usual way, most of the pattern would be "lost" under the larger focal point that is layered on top of it. It also allows the sunbursts to reach further to the edge of the card, especially if you are putting the center point "off center", as I have on these two cards. Notice on the 9th birthday card above that ALL the "rays" reach to the outer edge of the A2 sized panel.
Well, thanks for stopping by, and thanks Dawn and PTI for another great Make It Monday!


