Saturday, February 14, 2015

owl always love you

Yikes, it's been a while! But I made a card.... I MADE A CARD! I needed a card for hubby for Valentine's Day, so I finally found some time to sit down at my craft table and play! I'm also entering this in the challenge over at Papertrey Ink to "Create a new project that uses a stamp set from your collection that hasn't seen ink!" I finally inked up my Type Strips 2! And, although my Tremendous Treats: Valentines has seen ink, I don't believe this sweet little owl from the set has!

So here is what I came up with, inspired by this owl-valentines card of Betsy's.


I used a piece of paper from the Shakers & Sprinkles Make it Market kit for the background, and also used Falling Leaves for the branch and the Block Alphabet Dies for the word "love".


This little owl is so darn cute, he deserves a close-up! Just look at him! Why haven't I given him any love before??


Well, hopefully I'll find time to craft, and post, again soon! Be sure to check out all the anniversary celebration goings-on on Nichole's blog, and as always, thanks for stopping by! :)

Saturday, September 6, 2014

Happy Birthday... back from a hiatus!

Whoa.... over 3 months since I posted!? Clearly, I'm not making enough time in my schedule for crafting! But I did find my way to my craft table today, and made this card for my mother-in-law's 88th birthday! I think she will like it!

I used PTI's Botanical Blocks, which I purchased months ago but this is the first time it's seen ink! I even broke out the Copics to color the image, and am really happy with how it turned out. The sentiment is from Banner Sentiments. The flower panel is popped up on foam tape, and I added some pearls to snazz it up a bit.


Quick post as we have to leave soon to get the birthday girl and take her out for dinner. Hopefully, it won't be another 3 months before I have something to post! Thanks for stopping by! :)

Tuesday, May 27, 2014

Congrats 2014 Grad!

Two cards in 3 days? Look at me go! :) It feels so good to be getting back to some crafting lately! I had a graduation party to attend over the weekend for a lovely young lady, and wanted to make her a special card. I used the dies from the PTI Shakers & Sprinkles kit, using some seed beads that were similar to the school colors as well as some of the silver star sequins from the kit to fill the shaker box. I tried to match the school colors, sort of a burgundy and gold, using Scarlet Jewel and Summer Sunrise as my color scheme.


The card is 5x7 to accommodate the inside money-holder pocket, and I didn't like how the focal point panel looked centered on the card from, so adding the letters to the right side was my solution. I think it looks much better and the card feels more balanced! The "2014" and the letters for "GRAD" are both Bookprint Alpha Dies (numbers and letters).


Now to the inside, which was almost as much fun as the outside! I put the sentiment on the "top" inside panel. My plan was just to stamp it on the white base, but due to stamper error ;) that did not work out so well. Needing to cover up the mistake, I did this:


And finally, the money-holder at the bottom. I love the PTI zipper die for this kind of thing - so fun! When I cut the original card base, I cut it 11"x7", and scored at 5" and 10" so I had a 1" edge turned up on the inside. Then I created the zipper panel and adhered it to that edge. Put my monetary gift behind it, and adhere the top edge and about halfway up the side edges (so it holds, but will be easy to get open and retrieve the loot! :).


Here's one more look at an angle that really shows the dimension of the shaker box.


I would definitely do this card design again. I hope the graduate liked it! Thanks for stopping by!

Sunday, May 25, 2014

Papertrey Ink May Blog Hop

I. Made. A. Card.

Oh my.... I have so shamefully neglected my stamps and paper and ink for QUITE some time! It was a rough couple of semesters! But I've found some crafting time lately, and so happy to jump back in with a card for the May Blog Hop for PTI! The theme is "aqua and melon". OK, so I took some liberty with that and used Hawaiian Shores and Berry Sorbet... I think they are close enough! :)

I used dies from the newest Make it Market Kit (Sprinkles), but instead of making a shaker box, I just love these dies just for a great focal point/frame! I used the flowers and "SMILE" from Reasons to Smile (the limited edition set from last year's Stamp A Faire), and a butterfly from Beautiful Butterflies. The tag in the corner is from Framed Out #7.


The whole focal point is adhered on foam tape for added dimension.


Thanks for stopping by my blog! Be sure to hop around to all the entries in the PTI Blog Hop! Have a great day... and I promise to post again in less than 10 months this time! ;) lol!

Sunday, July 7, 2013

10th Birthday fun and a cute money holder!

A few days ago, my youngest baby turned 10 - double digits!! It's hard to believe! I wanted to share the card I made him, and also a money-gift holder.

The card uses stamps and dies from PTI and MFT, and some fun, boyish patterned paper from Echo Park - A Boy's Life.

The "10th" and the patterned "birthday" are both popped up on foam adhesive (yes, I painstakingly cut little bits of foam tape for the small letters, lol). The "it's your day" at the bottom wasn't part of my original plan, but I accidentally cut the pattern paper block too short so that was my solution - a happy accident, because I really like how it turned out!


Here is the money holder that I made with PTI's zipper border die. I will show you step-by-step how I made it, below.

First I cut a piece of the PTI Hawaiian Shores striped patterned paper 7.5"x7.5". You could use any paper, patterned or stamped. I liked this paper and it worked great - a good weight, and it is white on the reverse side. I scored the paper at 2" and at 4 7/8". NOTE: when scoring, think about the direction you want the pattern to go on the final envelope.


Now I folded the 2" piece under, and then placed the zipper border on the other side (the single-layer side), just eyeballing it to leave some space to the edge and being very careful that it was straight! Then run it through the die cut machine.


This is what the piece should look like at this point. Note that I intentionally put the start of the zipper on the right side because my little guy is left handed. It probably doesn't really matter much, but I do think that for a right-handed recipient, the zipper would be a little easier to manage if it zipped from left to right. I also used my craft knife to cut open the little connected pieces on the first "tab" of the zipper, just to make it a easier to get started (without ripping anything).


I choose to embellish both sides of the envelope. On the zipper side I added a simple border with sentiment and the "pull here" stamping.


On the back, I used the new PTI Big Ticket Basics.


Now, fold up the inside flap and adhere on the two sides. Put the money in, and then add adhesive to the zipper flap, just below the zipper, and seal the envelope closed.


This is what the final product looks like. The recipient then gets to rip that zipper open and see the bills inside. This same design could easily be modified to hold a gift card, too!


Well, that's it. I hope the extra pictures were helpful! Thanks for stopping by!

Saturday, June 22, 2013

A pair of Father's Day Cards

Today I'm sharing the last of the Father's Day cards I made this year, both for my husband - one from me, and one from the kids.

First, for the one from me, I used pattern papers from Simple Stories: Take a Hike 6x6 paper pad. This has some great masculine colors and patterns, which I paired with PTI's Canyon Clay, Kraft, Fine Linen and Dark Chocolate.


The top panel is on foam adhesive. I used PTI's Boutique Borders: Father and Birthday, and World's Greatest to put together the sentiment, and also Modern Wood Mats to coordinate with the Mat Stack 5 and Layerz cut out.   

For the card from the boys, I used paper from My Minds Eye: Follow Your Heart 6x6 paper pad (can you tell that I'm trying to use up more of this patterned paper that I've been "collecting", lol!?). The "DAD" is cut with PTI's Block Alphabet from Limeaid Ice. If you look closely, you'll see a tone-on-tone pattern that I stamped on the letters using Sketched Shapes (the large circle works perfectly, just line up the letter under the circle and stamp). I really like this little added bit of detail. Then I attached the letters to a Framed Out #1 die cut that I stamped with the frame.


The scroll is from Boutique Borders: Father and the "Happy Father's Day" is from World's Greatest, and the "You're the Best" is from Sunflower Bouquet.


Thanks for stopping by!

Wednesday, June 19, 2013

Sending You Love, Dad

Today I have a Father's Day card to share. This is the one that I sent to my Dad. I used Pinterest for some color inspiration (this pin) and came up with Canyon Clay, Summer Sunrise, Ripe Avocado, Spring Rain and Smokey Shadow. I reached for MFT's First Class Friend stamps and dies (a favorite go-to set, especially for masculine cards) and also incorporated PTI's Boutique Borders: Father.


The focal point label and the stamp are both popped up on foam adhesive.


And speaking of that stamp, guess how I made that? :)


The die cut is from MFT but I wasn't sure what I wanted to put on it. So just browsing through some stamp sets, I came upon Love Lives Here. I used one of the little house patterns, just centering the heart opening in the center of the stamp, and then added the heart from the same set. I love how it turned out! And so fun to come up with a new use for a stamp! 


I have two other Father's Day cards to share, so will try to get them posted in the next few days! Thanks for stopping by!

Friday, June 7, 2013

A Thank You for the Teacher

Are your kiddos finished with school for the summer? Usually mine would be by now, but they had a late start last fall due to renovations in their building... so they go through next Thursday! I told them last August when they were enjoying the extra time off, just remember - you'll be paying this back in June! ;) LOL! But anyway... I wanted to share a card I made for one of the teachers, to whom the class was giving a gift card. The main set I used was Teach & Inspire, with a little bit of School Time thrown in. The "you're the best" is from Tiny Tags 2. My colors are Pure Puppy, Limeaid Ice, Enchanted Evening and Summer Sunrise.


The chevron focal point was hand cut and then adhered with foam tape, after I added the pencil.


I added the Tiny Tag with a little brad.


Here's a tip - one of those things that might be obvious, but it felt like such a light-bulb moment when I thought of it that I wanted to share! I wanted to hand-stamp the apples for the background, but they just weren't turning out right. Then I thought to use my Hexagon Cover Plate die to create a sort of "stencil" to use as a guide to the apple placement. It worked perfectly! I'm definitely going to remember this little trick and use it again. I'm sure other cover plates would work too, to create differently-spaced patterns or for other small images!


Thanks for stopping by, and happy summer!

Sunday, June 2, 2013

Congratulations, Graduate!

This is a graduation card I made for a fine young man, one of our scouting friends, who just graduated high school! I tried to match his school colors, a burgandy-red and gold, with PTI's Scarlet Jewel and Summer Sunrise - I hope they came pretty close. This is a 4.5"x7" card, sized to accommodate a monetary gift, with a special "pocket" treatment on the inside that I'll show you below.

I used Fabulous Frames, Block Alphabet Numbers and Alpha Blocks dies for the main focal point, with the sentiment from Celebrations. The "it's your day" is from Framed Out #3. The arrow pattern is from Mama Elephant's On Target, and the graduation cap is from There She Goes' ConGRADulations set, stamped and then hand-cut.


I added texture to the background burgundy in the frame with a texture plate, and the frame and number blocks are popped up on foam adhesive.


On the inside, I put the sentiment (from Birds and Blooms, snazzed up a bit with the cap stamp again) on the left side, to make room for the pocket on the right side.


To make the pocket, I first folded up a flap from the cardstock base (cut 7"x11", then scored at 4.5" and at 9", so that I had the extra 2" to be the base of my pocket). I cut the bracket using the Edger #1 die, and adhered it to the inside of the flap. Then I added some Summer Sunrise striped paper to the top of the flap, and edged it with a strip of Summer Sunrise cardstock, just to give the whole edge a clean and finished look. I use a piece of Scor Tape on each edge to adhere the flap down and create the pocket.


Good luck to all those with kiddos graduating this year (we still have 6 years in this house, lol)! And thanks for stopping by!


Saturday, May 25, 2013

PTI's May Blog Hop - Beautiful Bouquets!

I managed to play along this month with the PTI blog hop - yay! The theme is "Bouquet Builder", and Nichole provided some awesome color combos as inspiration for a floral themed card. I used (roughly) the second color combo, with a couple of minor switches, to end up with: Harvest Gold, Summer Sunrise, Orange Zest, Raspberry Fizz, Hibiscus Burst, and for the leaves, Limeaid Ice and Simply Chartreuse.

I stamped a subtle background using Background Basics: Postmarks, and stamped the leaves from Happiness in Bloom directly over that. The flowers are also from Happiness in Bloom, but for something different, I layered the two larger ones with a Flower Fusion #4 as a center. For the smaller one, I just used a small circle die and stamped tone-on-tone from Sketched Shapes. A brad and buttons finish off the flower centers.


The sentiment is from Bountiful Banners. The banner and the flowers are all popped up on dimensional adhesive, and I custom colored some gems with a Copic marker to accent the banner.


Thanks for the great color combos Nichole, and thanks for stopping by!

Monday, May 20, 2013

Make it Monday - Paper Piecing

I'm sharing a card today to play along with this week's Make It Monday - Paper Piecing. I always like the look of paper piecing, but don't utilize the technique very much. since I needed a card for my nephew's upcoming birthday, I thought that Enjoy the Ride would be a fun set to use for this technique.


I pieced the car together using papers from Doodlebug's "Boys Only" 6"x6" paper pad. The car is popped up on my square card base, which I layered with Simply Chartreuse cardstock, Summer Sunrise and Limeaid Ice pattern paper, and a striped paper also from the Doodlebug line. I used a Fabulous Frames die to cut the frame from a piece of the Doodlebug paper - I thought the number pattern was appropriate for birthday theme.


Here's a close-up of the license plate, customized with Simple Alphabet. I just love doing this with Enjoy the Ride! :)


I'm really pleased with how this card turned out - I think it's bright, happy and fun, yet still masculine enough for a boy. I hope my nephew likes it too! I'm so glad that Melissa shared the paper piecing challenge this week - thanks, Melissa!

And thanks for stopping by!

Wednesday, April 17, 2013

still in Birthday mode!

I haven't been getting any cardmaking done lately, but I realized I have one more birthday card to share that I made a while back. I love how this one turned out! Used Birthday Style, Background Basic: Birthday Fun, Stylish Sentiments: Birthday.


The balloons are all popped up on foam adhesive, and I used coordinating twine for the strings.


The front panel is embossed with the Striped impression plate.


Thanks for stopping by!

Thursday, April 4, 2013

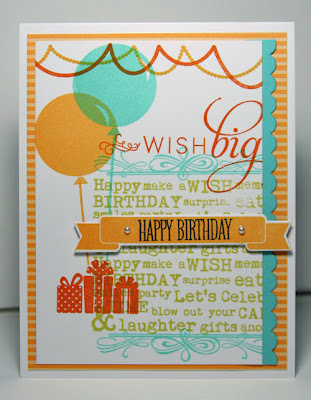
a Make it Monday Happy Birthday collage

I managed to play along with this week's Make it Monday challenge - collage elements! I am still in a birthday mood, so I used lots of PTI birthday sets, including: Boutique Borders: Birthday; Background Basics: Birthday Fun; Birthday Style; and Bountiful Banners. The color combo is Hawaiian Shores, Summer Sunrise, Orange Zest and Limeaid Ice - one of my new favorites for sure!


The sentiment banner is popped up on dimensional adhesive, and I added a little scalloped border strip using the heart border die.


Thanks for stopping by!