Wednesday, June 29, 2011

Happy Father's Day

OK, I know that Father's Day was a couple of weeks ago! I promise, my cards were on time... I just haven't gotten around to posting any of them until now! :) This is the card that I made for my daddy:


I used some of the PTI Argyle Socks patterned paper, which has a really nice selection of patterns for masculine cards! Also used Alpha Blocks set and die, Label Basics set and die, and a Fillable Frame, along with some buttons and twine, the Woodgrain Impression Plate, and the Edgers #1 die. And I stitched! I love stitching on cards and layouts, and would do it SO much more if only I had a thread fairy to change my thread and bobbin on my machine, lol! ;) But I'm trying not to be so lazy. :)

Both the label and the Fillable Frame are popped up with foam adhesive.


I gave my husband two Father's Day cards, but I never took a photo of one of them, so I need to track it down and get a pic so I can post those. :)

Thanks for looking!

Monday, June 27, 2011

Summer Card Camp Week 1

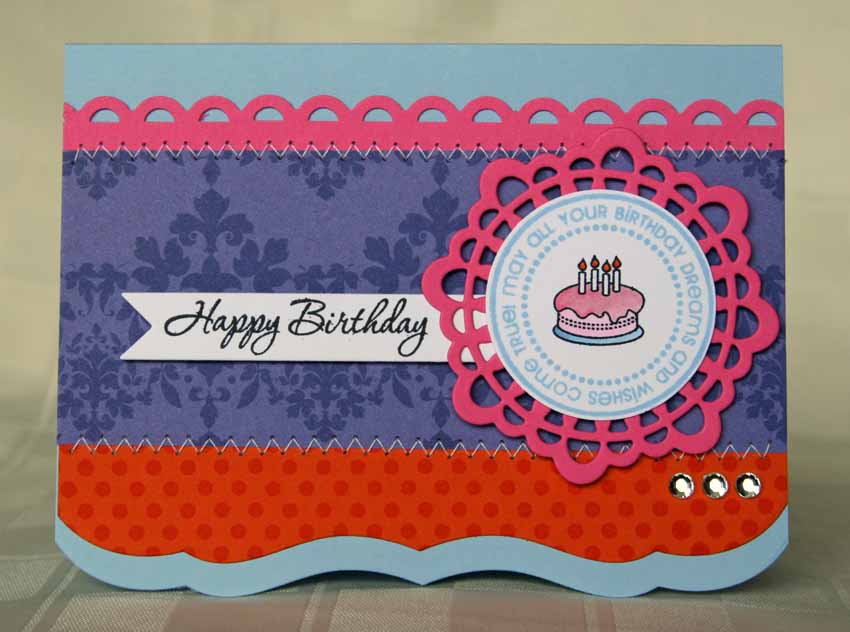
Summer Card Camp began today! Our week 1 color combo is definitely out of my comfort zone! Check it out:

I think the purple threw me off the most. I'm not a huge purple fan. But luckily, I did get the new Damask Designs patterned paper in the latest PTI release, and it includes a Royal Velvet pattern (I think I just might even buy a package of the cardstock in my next order.... gasp... did I just say that?). :) So I pulled out a sheet of that, long with some Hibiscus Burst, Orange Zest, Spring Rain and White. Here's what I ended up with:


I used Polka Dot Basics 2 to add the fun dot pattern to the orange. The sentiment is from Gracious Vases, the circle tag is from Birthday Tags and the cake is from Tiny Treats: Birthday. Dies used are Doily Details, banner, and Edgers #1. The banner and tag are popped up on dimensional adhesive. I added some stitching (I'm trying to do that more often!) and gems to finish things off.


I can't wait to see whats in store for tomorrow! I've already pulled some papers to try this color combo again. Thanks for looking!

Make It Monday: Polaroid Two-Step Masking

I've been on a roll and gotten quite a bit of stamping done in the past couple of days! Could it have something to do with the fact that: (a) Vacation Bible School, which I spent every spare minute on the past couple of weeks is over, and (b) I'm in denial about the fact that I start teaching a summer trig class a week from tomorrow? Whatever it is, I'll take it! I couldn't wait to tackle this week's Make It Monday, using Nichole's "Polaroid Two-Step Masking" technique. What a fun way to make a focal point!

I started to play around with this and was using kraft cardstock and white ink for my focal point panel, just like Nichole does in her video. But as I zeroed in on what I wanted for the focal image, I decided to try it with white cardstock and light blue ink. I really love how it turned out!


After masking and creating the blue frame, I masked the frame and stamped the rainbow and small balloon, then colored them both with Copics. Then I masked the rainbow and stamped the sun and rays. I die-cut and colored the larger balloon, and cut and textured the cloud with the Sunshine IP. The sentiment is from Vintage Picnic, and all the other stamps are from Up, Up and Away. Cardstock colors are Summer Sunrise, Orange Zest, and white.

Thanks for looking!

Sunday, June 26, 2011

Make it Monday: Reverse Masking

I finished a card for this week's Make It Monday challenge a couple of days ago, but just realized that I'd better it posted since the new challenge will be up tomorrow! The challenge is reverse masking - essentially, using the negative space of the stamped image as a mask. Here is my card:


After cutting the mat stack 5 shape, I used the long banner from Banner Builder to create the lines. Then I masked with Post-It notes on the lines, sponged in the "shelf" with blue ink, and added images from Grunge Me with Fresh Snow ink. Next, I stamped the vases outlines and solids from Gracious Vases, and created a reverse mask for each vase shape. Then I masked and one by one applied patterns from Text Style, Polka Dot Basics and Geometrics backgrounds sets. I added fillers from Gracious Vases, Fancy Flourishes and Sending You, and the sentiment from Gracious Vases. I popped it all up and attached a loop of ribbon (Terracotta Tile and Summer Sunrise) and a button, and added some stitching and layered it all on the new Damask Designs paper, Spring Rain and Summer Sunrise cardstock.

Thanks for looking! :)

Blog Giveaway WINNERS!!

Thank you to everyone who entered to win my first ever blog giveaway! (You can see the original giveaway post here.) After numbering all of your comments, I used Random.org to generate the prize winners.

First I drew for the Echo Park Paper Pad, Summer Days. Ohhhhh, this is such a fun pad of paper!
  
And the winner is....
Did you ever wonder if Random.org ever generates the first or last number on the list?? This time it did - Jen's was the last comment to post, lol! Congratulations, Jen! I hope you enjoy the paper!

And finally, the drawing for the amazing Papertrey Ink Anniversary Set Botanical Silhouettes:


And the winner is...(insert drumroll here):

Congratulations, Gina! I know you will love this set, and I can't wait to see what you create with it!

Jen and Gina, please email me (link in my top right sidebar) with your mailing address so I can get your prizes out to you! 

Thank you again to everyone for playing along, and for your kind comments. I hope you'll continue to visit my blog!


Wednesday, June 15, 2011

hello, friend

Just a quickie post, since I've been neglecting the blog lately! The boys got out of school and suddenly it seems like we are very busy with "summer vacation" stuff, lol!

I have to say that this is one of my favorite cards in a long time. I used PTI's Postmarks and Grunge me, with the Think Big Favorites sentiment. The background panel is sponged and then I used the lines-and-circles image from Grunge Me with a very light touch. I think it sort of looks like a foggy mist.


Thanks for looking, and don't forget to comment on this post for my Blog Giveaway, if you haven't entered yet! :)

Monday, June 6, 2011

my first ever BLOG GIVEAWAY!! :)

Who doesn't love a blog giveaway?? Well, I've always wanted to do one but never have, so I'm going to try to make this a good one! First of all, there are TWO prizes up for grabs! But I'll get to the prizes in a minute... first, I want to share a card!

This card uses the new Papertrey Ink Anniversary set, Botanical Silhouettes. This set is not available for purchase from PTI, but was only available as a bonus based on purchases from February 2010 - February 2011. I was, er, uhm, well... shall we say.... a good enough customer to have earned some extra sets! ;)

The flowers + fence panel here was inspired by this lovely card from Laurie. Along with Botanical Silhouettes, I used the new Beautiful Blessings, and the picket fence die. Of course, there's a little Tiny Tag on there, I love those little tags as a sweet finishing touch on so many cards, and I really loved Laurie's idea of tying the tag to the fence! 


The fence was cut from kraft cardstock, and then I ran it through the woodgrain impression plate which was inked, letter-press style, with Versamark ink. It gives just that little extra little bit of oomph to the impression to add a little more texture.


OK, now that the preliminaries are finished, let's get to....
the giveaway!

Like I said above, I managed to earn some extra PTI Anniversary sets, so I knew that I wanted to do a blog giveaway for one of my extra sets! So here is Prize #1: Botanical Silhouettes!


You can see the whole set, and also the amazing inspiration from the PTI Design Team in the gallery, here. And for even more amazing projects, check out Nichole Heady's work with the set on her blog, here.

BUT WAIT.... I know that many of my blog visitors are my fellow PTI-obsessed stampers who have already earned their own anniversary set (or two... or... more ;) and I don't want to leave you all out! So I'm going to also give away a 2nd prize to a separate winner, this fun and colorful 6x6 Echo Park paper pad, perfect for the summer days ahead!


And in both cases, I may have a few other little surprise embellishments and goodies to include as well!

HOW TO ENTER: just leave a comment below and tell me your favorite Papertrey Ink stamp set (even if you don't own it...yet!), and please let me know in your comment if you already have (or will be getting) the anniversary set! In that case, I will only include you in the random drawing for the Echo Park paper pad. International friends are welcome to enter, BUT please understand that I reserve the right to substitute a $10 PTI gift certificate, if shipping to your country turns out to be cost-prohibitive (or, in the case of the stamp set, to ship the stamps to you without the original packaging). :)

DEADLINE TO ENTER: 11:59pm Eastern Time, Saturday June 25. I will post the winner on my blog by noon on Monday June 27. Good luck, and thanks for visiting my blog!

Tuesday, May 31, 2011

Make It Monday: Cracked Glass technique

This week's Make It Monday challenge is to use the cracked glass technique as demonstrated by Heather Nichols and the great video tutorial. I have to admit that I struggled a bit with this one and pitched my first couple of attempts, but I'm finally happy with this result, using the new Year of Flowers stamp collection:


The "many thanks" sentiment is from Fillable Frames #1. I used the Take Three die, first to cut the "windows" from the kraft panel, and then to cut the squares from Vintage Cream, which I stamped with the YOF images, colored with Copics, and then applied the cracked glass technique to. I stamped the sentiment on the kraft panel, and then use the woodgrain impression plate, inked with a lighter brown ink for a letterpress effect. It is popped up on foam adhesive, on the Bella Blvd. patterned paper panel.


The Tiny Tags set and die always seems to be perfect for that missing finishing touch. I tied it on with some PTI twine, after applying the cracked glass technique to the tag as well.

Thanks for looking!

Saturday, May 28, 2011

Make it Monday: Sympathy Cards

The latest Make it Monday challenge from Nichole Heady is to make a sympathy card. This challenge is a great one, since many people struggle with (or avoid altogether!) making sympathy cards. I think it is one of the "must have" card types for my stash, though.

I took the challenge as an opportunity to put my new 2010 PTI anniversary set to use as well. The Botanical Silhouettes set is so classic and timeless, and I thought the soft, sweet images and lovely font would work well for a sympathy card.


I added a little "ribbon" of Modern Basics behind the focal point panel, and some twine and a button.


Thanks for looking!


Wednesday, May 25, 2011

Papertrey Ink May Blog Hop: Flowers!

If you are looking for an astounding amount of floral inspiration, just check out the links for the May PTI Blog Hop! The theme for the month is flowers. PTI has some amazing flower sets, but I decided to take a little bit of a different direction, and make a flower out of a Delightful Doily - especially fun since I just recently purchased the coordinating dies!

I sponged my background using Summer Sunrise, Orange Zest and Pure Poppy inks, working from the center outward. I colored my doily with Copics, using shades of orange and Hawaiian Shores, and then created a center using the frame and sentiment from Tag-Its #1.


I "double-stamped" the stem from Flower Fusion #1, added the bee from Tag-Its 3, the flight trail from Boy Basics: Frog Hop, the "friend" from Flutterby Friends and grass from Love Lives Here.


Both the flower and the flower center are popped up on dimensional adhesive for added fun! :)

Thanks for looking!

Sunday, May 22, 2011

Happy Birthday Merry - Blog Hop!

This is special Blog Hop post to wish a very happy birthday to a sweet friend from the Papertrey Ink forum, Merry. She has been through a rough patch lately so another forum friend, Taheerah organized this little surprise to lift Merry's spirits and brighten her day a bit!

So here is my card, posted in honor of Merry! I recently got the Label Basics set and dies and was eager to try them out. I've also had Modern Basics for about a month and have not put it to very good use. I also used two different Floral Fusion sets for the flower, and the sentiment is from Tag-Its #1. PTI colors are Hawaiian Shores and Orange Zest.


The flower is popped up on foam adhesive, and the tag it is on is also popped up.


Thanks Taheerah for putting this hop together, and Merry, I hope that you have been able to find a little bit of joy and sunshine today!

Wednesday, May 18, 2011

congrats to you card

This is a card I made for a friend and colleague who recently got a promotion! I didn't have any "job" themed stamps, so I went with a general congratuations card.


The patterned papers are Pink Paislee (orange) and Echo Park (green). I used Papertrey Ink's Alpha Blocks, Fillable Frame #4 and the Additions set, All About You, and BB: Text Style 2. 


The block letters are on foam adhesive, and the layered on the Frame tag and doily die-cut, and again popped up for dimension.

Thanks for looking!

Wednesday, May 11, 2011

still Making it Monday! another boy birthday card

Can you tell that I've been getting in more time than usual at my craft table lately? Ahhh, how I love May! Spring semester is over so I'm not teaching until I start a summer course in July... the boys are still in school. That means mama has a quiet house to herself! :) So I'm still working on inking up some of my newest stamps, and my nephew's birthday is coming up in a couple of weeks. So I used the MIM: Selective Inking technique again on this card, with the new Boy Basics: Out of this World stamps and die:


I inked the countdown number strip only down to the 4, and then used the larger "3-2-1- blast off!"sentiment to finish the countdown. The "it's your day" is from Fillable Frames #8 and is stamped on a banner die-cut. I loved coloring that cute little rocket ship and flame tail with Copics!

I also finished the inside, using a stamp from Birthday Tags. I liked that the stars tied in with the stars on the card front, and added some more stars from Out of this World (ok, maybe I went a little overboard... I don't think my nephew will notice, lol!).


Of course, the rocket & flames are popped up on the front, which I think really adds movement. I also embossed the Enchanted Evening front panel and added a border-punched strip along the bottom.


Thanks for looking!

Tuesday, May 10, 2011

Another Make It Monday - Selective Inking (TOP SECRET Birthday Card!)

I did another card for this week's Make It Monday Challenge, but shhhhhhhhh this is highly top secret since this card is for Tyler's birthday which is still nearly 2 months away! I didn't set out to make his birthday card, I just wanted to play with my new Train Tracks stamps and dies. But as the idea for the card came together, I just LOVED it so much that I decided to make it for Tyler!

The selective inking is on the "happy birthday" sentiment from Make A Wish, so that I could "balance" the sentiment on the train's crate cargo by splitting up the two words. I added the image from Ribbon Tails to create the "track" for the train, after inking it with black ink but then stamping it off once for a lighter, distressed effect. I used the "8" from Outline Alphabet, and colored it (along with the train cars, smoke puffs, and crates) with Copics.


The train is popped up on foam, of course. :) After completing the front panel, I felt that it was too "bottom heavy" and needed something for balance, to I reached for my Tiny Tags, and added a couple of sweet little sentiments. The circle tag is stamped with a Bitty Background Blocks image, and the star with the coordinating image from Tiny Tags.


Thanks for looking!

Monday, May 9, 2011

Make it Monday + Happily Ever Challenged = a card for the troops

This is definitely a personal record for me! I started and finished this card within a couple of hours of the posting of the newest Make it Monday challenge on Nichole's blog! I was planning some crafty time today anyway, and I also wanted to complete Ted's challenge to use red, white, blue and yellow to make a card suitable for Operation Write Home, which could be sent to the project that gives handmade cards to troops overseas so that they can use them to write home to loved ones. It's such a great cause to support, and although I've often heard of it, I've never actually sent them any cards. So thanks, Ted, for the "push" and for the link-ups to the info! I'm going to send this card and pull some others from my stash as well!

So, here is my card. The MIM technique is "selective inking", so I used Think Big Favories #2, and followed Erin's technique to ink just the "you". It was pretty much impossible to NOT get any ink on the last couple of letters in the word "thank", but I just used a baby wipe to carefully wipe off that stray ink before stamping. Then I combined the you with the new Alpha-Blocks set (quickly becoming a favorite!) to complete the sentiment. 


I added the frame from Tag-it's #2 and a Doily Details die-cut, along with a border-punched strip and some Bella Blvd. patterned paper. The block letters and the doily are all popped up on foam adhesive.


Thanks for looking!